React.js Docs
The smallest React example looks like this:
const root = ReactDOM.createRoot
          (document.getElementById('root')); root.render(《h1》Hello, world!《/h1》);
It displays a heading saying “Hello, world!” on the page.
Consider this variable declaration:
const element = 《h1》 Hello, world! 《/h1》 ;
- This funny tag syntax is neither a string nor HTML.
- It is called JSX, and it is a syntax extension to JavaScript. We recommend using it with React to describe what the UI should look like. JSX may remind you of a template language, but it comes with the full power of JavaScript.
- JSX produces React “elements”. We will explore rendering them to the DOM in the next section. Below, you can find the basics of JSX necessary to get you started.
- React embraces the fact that rendering logic is inherently coupled with other UI logic: how events are handled, how the state changes over time, and how the data is prepared for display.
- Instead of artificially separating technologies by putting markup and logic in separate files, React separates concerns with loosely coupled units called “components” that contain both. We will come back to components in a further section, but if you’re not yet comfortable putting markup in JS, this talk might convince you otherwise.
- React doesn’t require using JSX, but most people find it helpful as a visual aid when working with UI inside the JavaScript code. It also allows React to show more useful error and warning messages.
- With that out of the way, let’s get started!
In the example below, we declare a variable called name and then use it inside JSX by wrapping it in curly braces:
const name = 'Josh Perez';
const element = 《h1》 Hello, {name}《/h1》 ;
You can put any valid JavaScript expression inside the curly braces in JSX. For example, 2 + 2, user.firstName, or formatName(user) are all valid JavaScript expressions.
In the example below, we embed the result of calling a JavaScript function, formatName(user), into an h1 element.
function formatName(user) {
  return user.firstName + '
  ' + user.lastName;
}

const user = {
  firstName: 'Harper',
  lastName: 'Perez'
};

const element = (
   《h1》
    Hello, {formatName(user)}!
   《/h1》
);
We split JSX over multiple lines for readability. While it isn’t required, when doing this, we also recommend wrapping it in parentheses to avoid the pitfalls of automatic semicolon insertion.
After compilation, JSX expressions become regular JavaScript function calls and evaluate to JavaScript objects.
This means that you can use JSX inside of if statements and for loops, assign it to variables, accept it as arguments, and return it from functions:
function getGreeting(user) {
  if (user) {
    return 《h1》Hello

    {formatName(user)}!《/h1》;
  }
  return 《h2》Hello, Stranger 《/h2》;
}
You may use quotes to specify string literals as attributes:
const element = link ;
You may also use curly braces to embed a JavaScript expression in an attribute:
const element = 《img src={user.avatarUrl}》《/img》;
Don’t put quotes around curly braces when embedding a JavaScript expression in an attribute. You should either use quotes (for string values) or curly braces (for expressions), but not both in the same attribute.
Warning:
Since JSX is closer to JavaScript than to HTML, React DOM uses camelCase property naming convention instead of HTML attribute names.
For example, class becomes className in JSX, and tabindex becomes tabIndex.
If a tag is empty, you may close it immediately with />, like XML:
const element =

《img src={user.avatarUrl} /》;

JSX tags may contain children:

const element = (
  《div》
    《h1》Hello!《/h1》
    《h2》Good to see you here.《/h2》
  《/div》
);It is safe to embed user input in JSX:
const title = response.potentiallyMaliciousInput;
// This is safe:
const element = 《h1》{title}《/h1》;
By default, React DOM escapes any values embedded in JSX before rendering them. Thus it ensures that you can never inject anything that’s not explicitly written in your application. Everything is converted to a string before being rendered. This helps prevent XSS (cross-site-scripting) attacks.
Babel compiles JSX down to React.createElement() calls.
These two examples are identical:
const element = (
  《h1 className="greeting"》
    Hello, world!
  《/h1》
);
const element = React.createElement(
  'h1',
  {className: 'greeting'},
  'Hello, world!'
);
React.createElement() performs a few checks to help you write bug-free code but essentially it creates an object like this:
// Note: this structure is simplified
const element = {
  type: 'h1',
  props: {
    className: 'greeting',
    children: 'Hello, world!'
  }
};
These objects are called “React elements”. You can think of them as descriptions of what you want to see on the screen. React reads these objects and uses them to construct the DOM and keep it up to date.
We will explore rendering React elements to the DOM in the next section.
Elements are the smallest building blocks of React apps.
An element describes what you want to see on the screen:
const element = 《h1》Hello, world《/h1》;
Unlike browser DOM elements, React elements are plain objects, and are cheap to create. React DOM takes care of updating the DOM to match the React elements.
Note:
One might confuse elements with a more widely known concept of “components”. We will introduce components in the next section. Elements are what components are “made of”, and we encourage you to read this section before jumping ahead.
Let’s say there is a 《div》somewhere in your HTML file:
《div id="root"》《/div》 We call this a “root” DOM node because everything inside it will be managed by React DOM.
Applications built with just React usually have a single root DOM node. If you are integrating React into an existing app, you may have as many isolated root DOM nodes as you like.
To render a React element, first pass the DOM element to ReactDOM.createRoot(), then pass the React element to root.render():
const root = ReactDOM.createRoot(
  document.getElementById('root')
);
const element = 《h1》Hello, world《/h1》;
root.render(element);
It displays “Hello, world” on the page.
React elements are immutable. Once you create an element, you can’t change its children or attributes. An element is like a single frame in a movie: it represents the UI at a certain point in time.
With our knowledge so far, the only way to update the UI is to create a new element, and pass it to root.render().
Consider this ticking clock example:
const root = ReactDOM.createRoot( document.getElementById('root') ); function tick() { const element = ( 《div》 《h1》Hello, world!《/h1》 《h2》It is {new Date().toLocaleTimeString()}.《/h2》 《/div》 ); root.render(element);} setInterval(tick, 1000);
It calls root.render() every second from a setInterval() callback.
In practice, most React apps only call root.render() once. In the next sections we will learn how such code gets encapsulated into stateful components.
We recommend that you don’t skip topics because they build on each other.
React DOM compares the element and its children to the previous one, and only applies the DOM updates necessary to bring the DOM to the desired state.
You can verify by inspecting the last example with the browser tools:
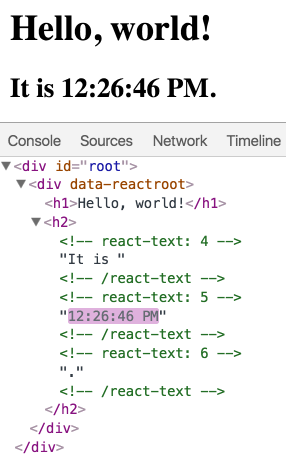
Even though we create an element describing the whole UI tree on every tick, only the text node whose contents have changed gets updated by React DOM.
In our experience, thinking about how the UI should look at any given moment, rather than how to change it over time, eliminates a whole class of bugs.